|
|

|
Which Prop = Goes Where - On Boats? A Lot of modelers get confused about this issue. So I created these Moving Drawings - Below, to help ease some of the confusion. And by the way - Guys .... "Propellers" are called = "Wheels" in Workboats, a term from steamboat days that's still respectfully used by Tradition. And Remember .... A boat always has the tendency - to turn, in the very same direction, as its - Propeller Is Turning. And these drawings below, show this and how this effect can be canceled by using opposite turning wheels = props. Just remember that these drawings show the vessel always - Going Ahead, while your looking at the - STERN!
RH Prop
Single Screw Boats, typically use a "RH - Propeller", so this means the propeller - torque will always try to turn the vessel - Starboard or "Right". Naturally if a the boat uses a "Left Hand" Prop, this would cause the torque to turn the vessel = to Port!
LH-Prop torque
Twin Screw Boats.... use both = LH & RH Props, also called wheels, fro steamboat days. Note how twin screw - propellers are OFF SET from the exact center line of the hull. So each propellers - torque as it spins, has its hull torque, canceled out. If you used a RH turning prop = on the Port side, its torque would have a drastic effect and would make the vessel steer much harder. Therefore the use of Left / Right Hand turning props, helps to cancel these effects on vessels. Reducing Hull - Torque, can also be enhanced by the use of special - Spit Rudders, called Contrguide Rudders. ( See Below Info ) _____________________________________________________________________________
( 1 ) LH Prop
torque
Triple Screw Boats, use a combination of 2 = RH props, with a LH turning propeller. And the In-board engine - is used primarily, for additional power and not generally used when doing close-in maneuvers. When maneuvering, pilot's more often used the two "Outboard Engines", because they apply a greater angle on the thrust provided by the boat.. But when needed, pilot's use all 3 - engines, to manhandle tows that require gentle, skillful - pressure and this means the outboard engines are the most often used on these huge towboats. _____________________________________________________________________________
Making Scratch - Wheels = Props! Hey Guys .... Remember those fancy little "Rubber Fishing Worms", that ya got hidden away in your ole Tackle Box? ......"Yeah - those little fancy tiny "Chrome Propellers" or Spinner's, that are mounted on them lil tiny rubber worm lures. Yeah, the ones you've meant to always throw away and replace, because their - all worn out! ...... Well if you wanna make "Tiny Propellers" for a scale model boat, take a pair of those little - 2-blade spinners and cross them, and you've got a four blade = PROP! .... NEAT HUH. Made in just seconds, using a solder gun to weld the spinners together and mount them on a length of brass tubing used as the drive shaftl - Now Ain't That A - Kick In The Head! Tap Drawing To Enlarge
Tap Drawing To Enlarge
_____________________________________________________________________________
Balancing a Prop & Shaft Regardless of the type, or size of a Drive Shaft - "It needs balancing" to reduce hull vibration. Because that robs - shaft rpm and motor speed and power and reduces a models performance. All this, is just as critical - in a workboat, as it would be, in a Race Boat!
_____________________________________________________________________________
Tools Required To Make A - Prop Balancer #1 ... Dremel Tool & Bitts = Cut-off Wheel, Sanding Drum... to cut and shape parts. #2 ... Solder Iron or Solder Gun, plus tip cleaning tools, or a Small Propane Hobby - Torch. #3 ... 60/40 Rosin Core - Electronic Solder and Soldering Paste. #4 ... 200 Grit - Sandpaper, to clean and polish brass tubing ( All Points ), prior to soldering and assembly. #5 ... Bench Vice - to hold parts for assembly. #6 ... Scrap block of wood, approx - 4 to 6 inches long. #7 ... 50/50 epoxy Glue, or CA Glue to weld Razor blades to Wooden block! _____________________________________________________________________________
Polishing - Brass Naturally you want new - Props, to look their best, regardless of whether you made them or purchased them from a hobby supplier. So here is how you can polish them - to a real professional shine. #1 - Small bottle of "SNOW BOWL" Toilet Cleaner. .... "CAUTION = Use Gloves & Ventilation with Acids!" #2 - Rubber Gloves / Goggles & A small Jar = 1/2 full of Snow Bowl #3 - An Empty - 1 Gallon Paint - CAN, with Lid ...... ( Fill - half full of = SAND ) #4 - 1 Package of "Fine Grade" - Steel Wool #5 - A "Reversible - Variable Speed = Electric Drill" #6 - Johnson's - Floor Wax ( Paste ).... Adds Shine - to Brass Props - When On Display! STEP ONE - REMOVING SCRATCHES & POLISHING = Using an Electric Drill, to spin your wheels = props ( Mounted on their - Drive Shafts ), with the shaft connected to an electric - hand drill. Placing the prop slowly - as its turned, down into the Paint Can, filled with Sand and about 2/3's - full of Hot Water. Spin the props - in both directions for short periods, checking your progress. NOTE - The sand can be finely sifted - If desired, using some "Old Window Screen" to remove larger granules. And to remove basic tarnish & scratches, this method works fine with ordinary sand and warm water, then dip the props into a small jar, with some Snow Bowl Toilet Cleaner. Leave them only a few seconds, then rinse with fresh water, or they will turn black, from the acid. USE CAUTION - With Snow Bowl, its a Toxic Acid to skin, Eys and your Nose! .....So Use Rubber Gloves and Eye Protection in a well = Vented Area!! Steel Wool - can then be used on rough areas, where "Water / Sand or Snow Bowl", didn't completely clean or polish the brass. Then use automotive - paste wax, or Johnson's Floor = Paste Wax, to polish and shine props to much brighter luster _____________________________________________________________________________
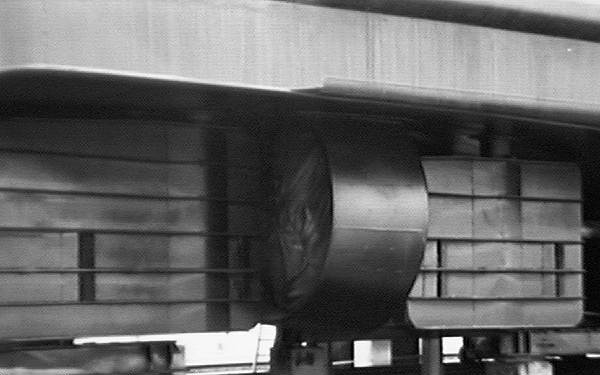
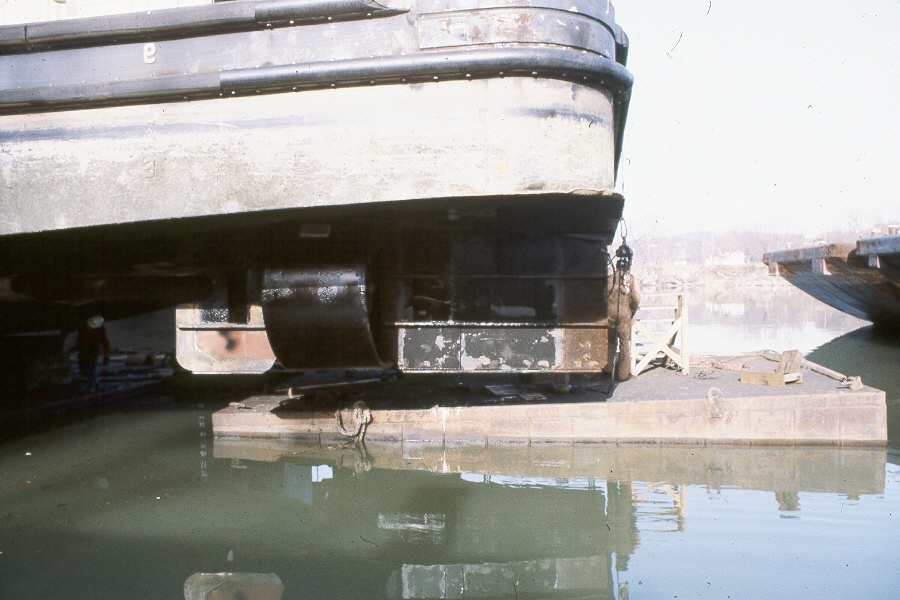
Kort Nozzles Korts as their called, are different looking on Towboats, from those used on other types of Workboats. And below are a couple of examples, because there are several styles and they fit different applications. Sometimes equipped with Pintle Bearings for the stern- rudder, which means they have included = rudder posts, or skid plates that hold the lower part of stern rudder as well. And then there are Korts - That don't have such additions, and their shapes can vary greatly from what you might be used to seeing or expect - if your a Tug Modeler and Towboat are new to you. Tap Photo to Enlarge
Tap Photo to Enlarge
_______________________________________________________________________
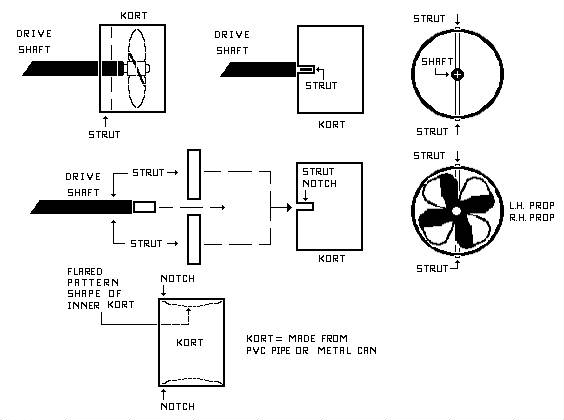
How To Scratch Build - Kort Nozzles For model Towboats .... use a "Tin Can" or short length of "PVC" Plastic Sewer or Water Pipe, that's been shaped to the styles or type Kort Nozzle, your model requires. Tap Drawing to Enlarge
Tap Photo to Enlarge
WARNING! .... Don't ever use common types of 50/50 = Hobby Epoxy to mount a drive shaft or Rudder system! ..... Those brands of glue - comes loose and break down after being in contact with moisture. Even if several coats of paint are applied over the glue, it won't stop moisture from breaking it down. Modelers often use hobby epoxy on model boats, then a short time later, suddenly notice it falling apart??? So remember this, when using typical brands of 50 / 50 hobby epoxy glue, it just doesn't work! ......And J-B Weld = WILL NEVER FAIL! I'll Add More - Later, so check back Often _______________________________________________________________
Last Updated
On 06/29/23 .
With
|


 Use a 4 to 6" length of scrap - block of wood,
and glue a pair of "Single or Double - Edged Razor Blades" to each end
of the block, as shown in this drawing. Making sure they are level
with one another. Then lay your Drive Shaft & Prop, across the
blades, which is now the balancer, to check them ( as shown in the
bottom drawing ). The heavy side - of the drive shaft, will roll to
the bottom and Indicates a need for a small amount of weight needs to be
removed. "Polish Off" a small portion of the "Solder" around the Prop
or in the heavy areas of metal on the Prop. Also check the props -
fluke, are they the same pitch and same lengths, by slowly turning the
prop = wheel, with an object close to them, for measuring a crooked
prop. These steps will gain a better balance to the shaft and make
balancing easier. Then rotate and recheck - balance again, to insure -
its right, or repeat until correct. NOTE ... Be
sure the table your using, is also "LEVEL", before you use this system
on it. Because it can effect - Shaft balance sometimes - if your not
careful.
This balancer, is not made to adjust
"High Speed" props for Race Boats, but it works on much the same
principle. And its cheaper than buying one - For Sure!
Use a 4 to 6" length of scrap - block of wood,
and glue a pair of "Single or Double - Edged Razor Blades" to each end
of the block, as shown in this drawing. Making sure they are level
with one another. Then lay your Drive Shaft & Prop, across the
blades, which is now the balancer, to check them ( as shown in the
bottom drawing ). The heavy side - of the drive shaft, will roll to
the bottom and Indicates a need for a small amount of weight needs to be
removed. "Polish Off" a small portion of the "Solder" around the Prop
or in the heavy areas of metal on the Prop. Also check the props -
fluke, are they the same pitch and same lengths, by slowly turning the
prop = wheel, with an object close to them, for measuring a crooked
prop. These steps will gain a better balance to the shaft and make
balancing easier. Then rotate and recheck - balance again, to insure -
its right, or repeat until correct. NOTE ... Be
sure the table your using, is also "LEVEL", before you use this system
on it. Because it can effect - Shaft balance sometimes - if your not
careful.
This balancer, is not made to adjust
"High Speed" props for Race Boats, but it works on much the same
principle. And its cheaper than buying one - For Sure!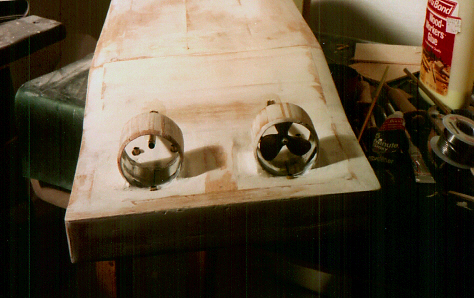
 TM
TM