Fire Boat
Tips on construction:
Click on thumbnails to enlarge.
| The Pump
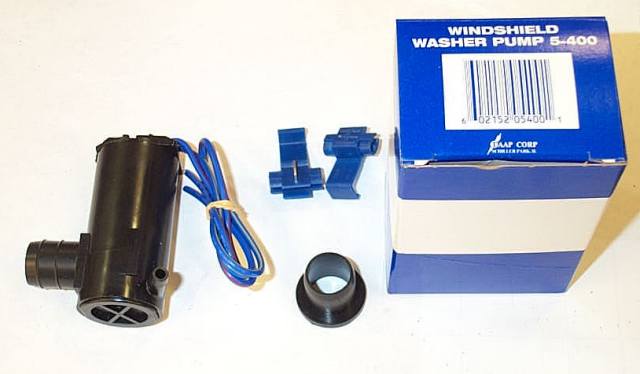
Autozone part # 227957. A model 5-400 windshield washer pump for a Nissan. 2.6 ounces, 2.7" long, 1.2" dia, 1/4" outlet, 5/8" inlet. Throws a 12 foot stream from the outlet with a 7.2 volt battery. $14.99 in 2002. It includes electrical connectors and a rubber grommet that will seal the inlet to a round hole. The manufacturer says the pump is rated for 3-second bursts at 13.8 volts, I found it runs cool at 7.2 volts for much longer periods. In tests, with 6 cells, 7.2 volts, (pump alone) it drew 2.9 Amps and pumped 1.25 gallons in one minute. With the specified nozzle, it drew 2.6 Amps and pumped 0.6 gallon of water in one minute. After the tests, the sealed plastic motor housing was slightly warm. |
 |
| Set the pump in the bow. Reduce the front ballast weight to compensate for the weight of the pump. Carefully cut through the Internal Tray with a hobby knife or hot blade. Cut a large enough hole so you can take a pencil and draw a circle around the inlet tube against the inside of the Hull. Cut out the circle and insert the pump inlet through the Hull. | 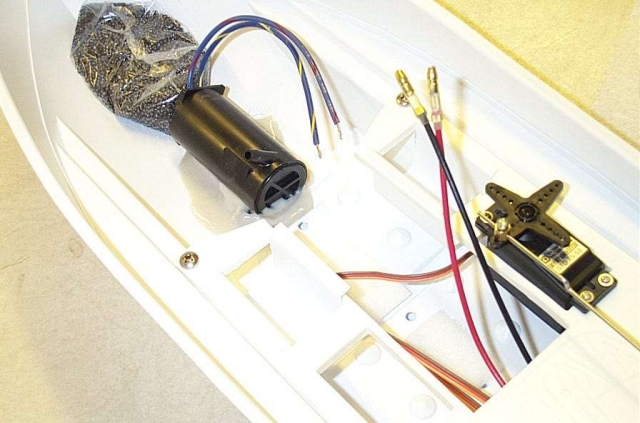 |
| I messed up at this point. I should have set the pump in a bed of Marine Goop instead of epoxy or used the supplied rubber grommet gluing it into the hole instead. If this pump ever fails, I might destroy the hull trying to remove it. (LESSON: Don't use too much or too strong of an adhesive and consider using the grommet to connect the pump to the hull.) If you use silicone caulk, be sure to paint the hull first as the silicone will repel the paint. Any silicone caulk on your fingers will contaminate any surface you touch and repel the paint. | 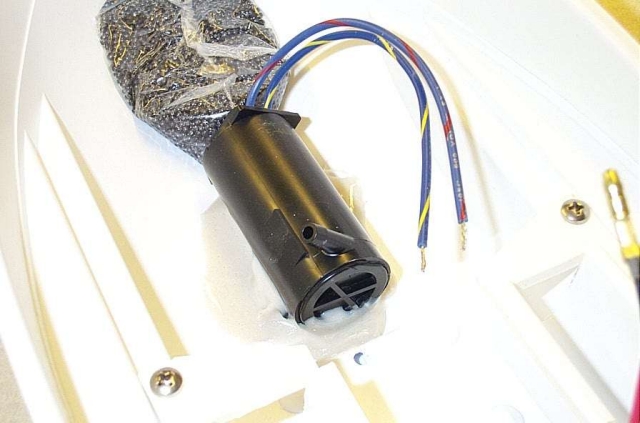 |
| Before gluing the pump to the hull, mark the inlet of the pump where it extends from the hull, lift out the pump and saw off the inlet at the mark. Epoxy a faucet screen over the inlet to prevent the pump from ingesting debris. (great idea Don!) The glue joint must also seal around the inlet to prevent leaks. Put a piece of clear packing tape on the outside of the Hull, over the hole before gluing for easier cleanup. Remove it after the glue completely sets. | 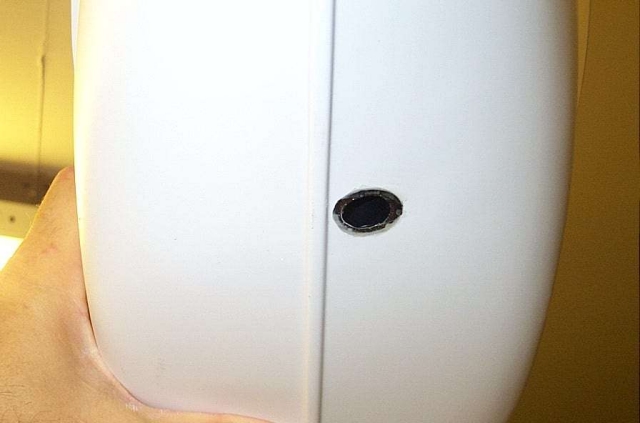 |
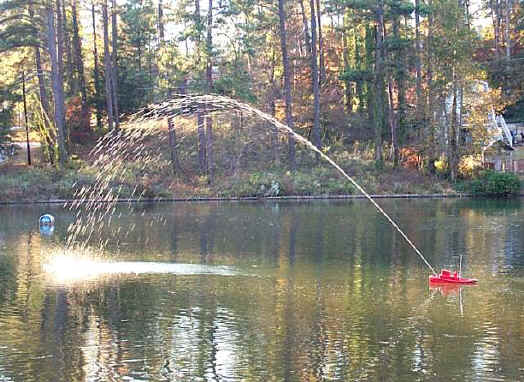
| Build the nozzle in two pieces. The first is the base to glue to the deck. It is made of a brass washer (Ace Hardware) and a piece of 1/4" OD brass tube. Drill the washer to fit the tube & solder (or epoxy) together. Bend a 3/16" brass tube, solder a smaller washer onto it. Epoxy two 1/2" pieces of smaller tube, 5/32" first then 1/8" inside that, to make the end of the nozzle. Put the epoxy on the piece your are inserting to prevent clogging the nozzle. Glue the base to deck. Insert the nozzle into the base. Push a silicone aquarium air hose over the end of the nozzle pipe and connect to the water pump. The nozzle can be made to rotate. However, when pointed to the side, the force of the water will turn the boat making it hard to control. It is much easier to control pointed strait ahead so you can aim with the rudder turning the whole boat. | 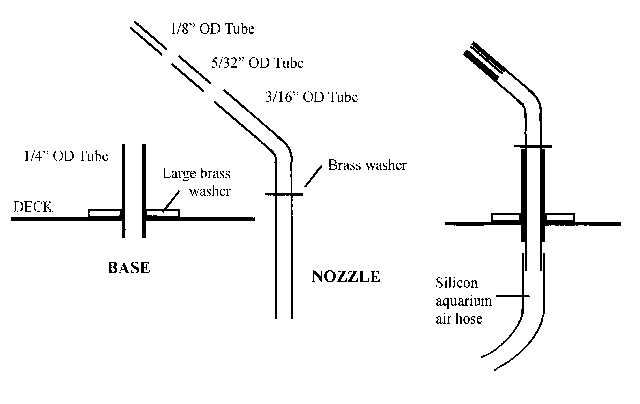
Click HERE to learn how to bend rigid brass tubing without kinking it. |
| I epoxied the base through a small hole drilled in the deck. Roughen the underside of the brass washer and the part of the deck it contacts for better adhesion. The separate nozzle allows you to experiment with different nozzles without having to remove the base. Try a "Y" nozzle that points left & right for those regatta water displays. The nozzle will rotate but I lightly glued it in place pointed strait toward the bow. One day I'll make it more realistic and add an "O"-scale fireman to hold it. | 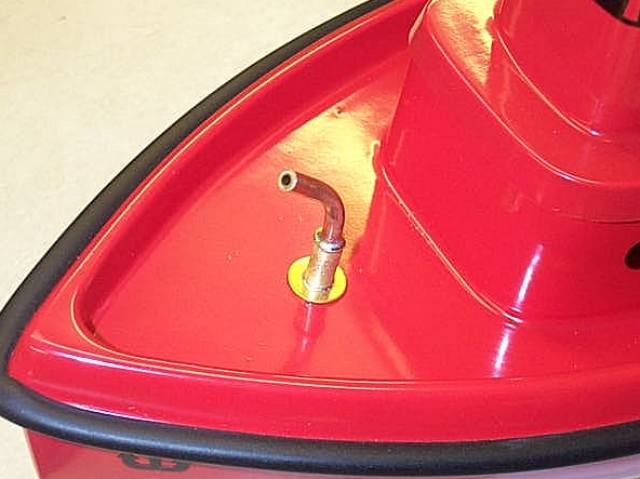 |
| I like to use connectors so I can move the guts from one boat to another. Soldered connections are cheaper and have less electrical resistance but are lots more trouble to remove. Tap the battery using a "Y" adapter (sold to connect two batteries together). Plug in a connector. Black negative (-) wire to the negative (-) pump wire. Red positive (+) wire through a switch then to the pump positive (+) wire. Activate the switch with a servo connected to the 3rd channel of the radio. For two-channel operation: Let the pump switch be activated by the rudder servo when the rudder is in an extreme left or right position. Or, with a servo splitter cable, "Y" a second servo to the rudder servo and use that to activate the pump switch. | 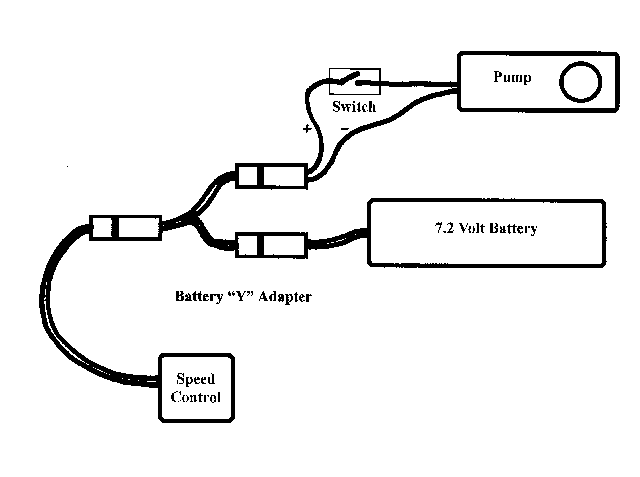 |
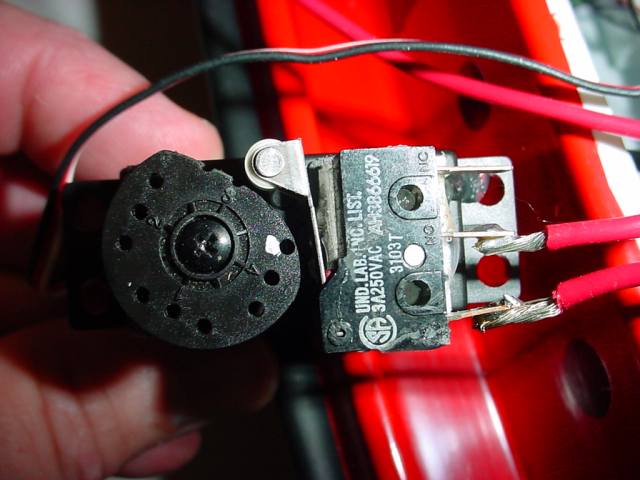
| A view inside a Fire Boat. The Hitec Focus 3 SS, 3-channel AM single stick radio, comes with 2 servos. An inexpensive on-off switch for the pump can be made with the second servo and a small 5 amp Radio Shack micro-switch. Place the servo/switch in the 4th pocket of the Motor Tray. | 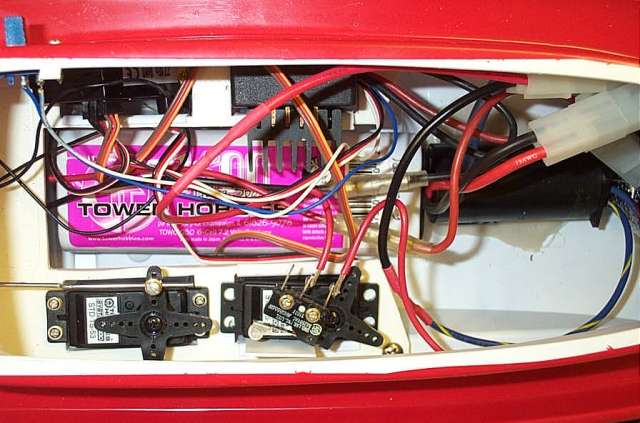 |
| Using the mounting screws that came with the servo, mount the switch to the servo arm. (The holes in both the switch and servo arm had the same spacing.) Tape a plastic scrap to the side of the servo. In the maximum throw position, the switch clicks "on". Drop into the tray. Screw mounting is not necessary. You should put some shrink tube on the connections to prevent electrical shorts. Note that I had to cut off one of the 4 servo arms to clear the plastic piece contacted by the switch lever. | 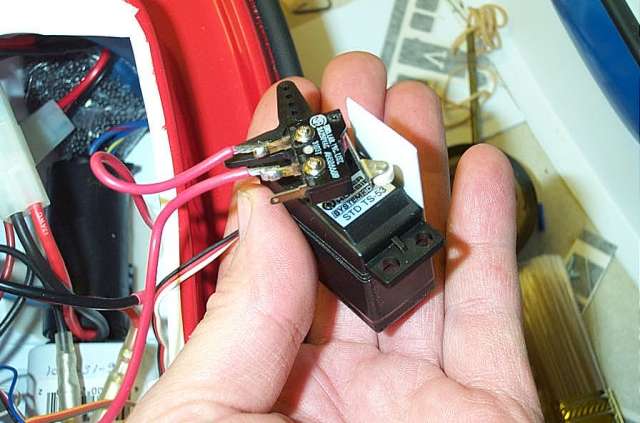
|
|
Philip S. found a better method that doesn't stress the wires. Mount the switch on the servo, using glue, tape, or both. Use a round servo arm (or attach a disk to a standard servo arm) to make a cam to press the switch lever. I'm using a 3-amp switch. I should use a 5 or 10 amp model due to the draw of the pump motor, but this was all I had at the time. His arrangement was similar to this: |
|
| To prime the pump, press the bow of the boat down (to get the waterline above the pump housing) while activating the pump. It may prime itself. I built this boat at a total weight of 67 ounces. (battery and all equipment installed) Removing 3 ounces of ballast from the bow would raise the bow slightly. The ideal weight is 64 ounces. I don't think I'll bother making the adjustment. | 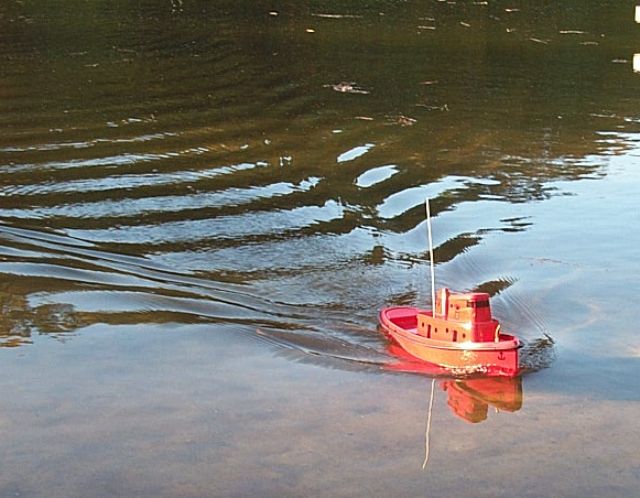 |
| The water pressure pushes the boat rearward. Gentle forward throttle will counter the force of the water and the boat will hold still in the water. You can then aim by working the rudder. Range is about 16 feet. Tons of fun! | 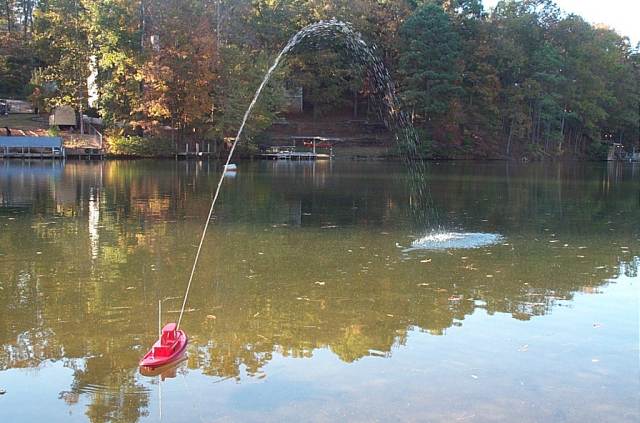 |
 TM
TM